


Thursday, November 24, 2011
Monday, November 21, 2011

Everyone knows at least one reluctant vegetable eater. Maybe you are one... (ahem, Buddy). Perhaps I'm being too idealistic, but I can’t accept that anyone actually hates vegetables—you just have to find the right recipe. This particular veggie recipe is another one that’s almost too easy to blog about, but again is too special not to write about.

It's the perfect comfort food; it has a warm, velvety richness, but there's nothing complicated about this dish. When the sky goes grey and the wind picks up, this is what I crave. Forget chicken noodle soup--when I get sick, I want comfort from something more substantial, and these carrots fit the bill exactly. As a matter of fact, when my sister's wisdom teeth were removed, these carrots--in mashed form--were all she ate for a week.


Now, fast forward a few years, to when Buddy and I started dating. When I first discovered Buddy's aversion to fruits and vegetables, I was aghast! Almost three years later, it's an ongoing mission to convert him into a veggie lover, except now it's also become a running joke. I still get teased when I have an orange for dessert, or you know, say that pizza isn't a vegetable, and Buddy still sends me emails like this:
 |
| Link here to article on listeria-plagued cantaloupes |
Even so, I like to think that I've made some progress on my vegetable crusade--thanks to this recipe. Buddy may not remember, but these carrots are the first vegetables I've cooked for him, which he grudgingly liked, and even had seconds of. No one can resist anything covered with melted butter and brown sugar, and I can certify that this dish is the gateway drug of veggies. More than that though, these Brown Sugar Glazed Carrots are perfect for a cold day like today, perfect for snuggling on the couch with a bowl full of carrots and sharing them with someone you love--even if they claim to hate veggies.

Brown Sugar Glazed Carrots
Adapted from my mom
Total Recipe Cost: $0.79 for 4 servings!
I use a lot more butter here than my mom does, but I’m young, and don’t have cholesterol problems—yet. If you’re not a butter fiend, I’d definitely start with ½ T butter, and add in small increments until you reach your desired buttery-ness.
4 large carrots
1 tablespoon unsalted butter
1 tablespoon brown sugar
salt (almost 1/2 teaspoon)
parsley (optional)
Set water in a large pot to boil. Meanwhile, peel and chop carrots into approximately ½” thick pieces. Drop the carrots into boiling water, and cook 3-5 minutes, or until the carrots reach your preferred tenderness. Drain the carrots, and return them to the pot (heat off, or very low to help the butter melt). Add the butter and brown sugar, and stir until the carrots are evenly coated. Salt to taste, though you’ll need more than you expect. Top with parsley to garnish. Serve this to the vegetable-haters in your life, and dare them not to love it!
Ingredients | Unit Cost | Total Cost |
4 large carrots | $0.33/lb | $0.66 |
1 T unsalted butter | $0.11/T | $0.11 |
1 T brown sugar | $0.28/C | $0.02 |
salt | negligible | |
pepper | negligible | |
parsley | negligible | |
TOTAL | $0.79 |
Questions about Total Recipe Cost? Click here!
Thursday, November 10, 2011

There's a decidedly crisp chill in the morning, scarves are coming out of the closet, and I have a definite craving for some hot apple cider. It's official; summer's over, even here in San Diego. Of course, seeing as today's high was 74F, everyone's still in sandals, and I recently went to a pool party, I'm not quite ready to start blogging exclusively about braised meats, hearty stews, and all things root vegetable.

This broccoli panzanella is a good compromise of the seasons; it's a refreshing, summery slaw, but the star of the dish is broccoli, a cool season crop. As soon as I saw the recipe, I needed to try that tangy buttermilk dressing. Mostly though, I had to make it because I'm a sucker for slaws. I'm not fooling anyone by calling this a panzanella. Sure, bread is added here for a reason--it contributes the perfect amount of saltiness and texture--but the foundation for this recipe is unabashedly a slaw. To be honest, I'm obsessed with slaws and perhaps you can tell, given that they're featured in >20% of my posts now.
I love almost all slaws, but this dish in particular is special. With its light but creamy dressing, it's decadent yet still healthful. There's a sweetness from the cranberries, but also some heat from the red onions. It's a veritable playground of textures, from the crispy croutons to the crunchy broccoli, and every cranberry is a sweet surprise. I can't stop at just one serving, but hey--it's broccoli, so eat up!

Broccoli Panzanella
Adapted from Smitten Kitchen
Total Recipe Cost: $5.54 for 8 servings!
A panzanella is traditionally an Italian salad of bread and tomatoes with an oil and vinegar dressing. I took some liberties with naming this dish--panzanella is such a fun word, I had to use it! However, I do want to highlight the bread component in this recipe. In short, I'm a big advocate of homemade croutons; they're so easy, so cheap, and sooo perfect for snacking. :)
Croutons:
1/2 loaf of crusty french bread
2 tablespoons olive oil
oregano
salt
pepper
Dressing:
1/2 cup buttermilk
1/3 cup mayonnaise
2 tablespoons cider vinegar
1 tablespoon sugar
1 cup of walnuts
2 heads of broccoli
1/2 small red onion, finely chopped
1/2 cup of dried cranberries
Preheat oven to 400F. Cut bread into small chunks and arrange on a baking sheet. Drizzle with olive oil and generously season with oregano, salt, and pepper to taste. I like my croutons crispy on the outside, and slightly chewy on the inside, so I toast them for 10 minutes--increase the time to 15-20 minutes if you like them crisp throughout. Set the croutons* aside to cool.
To toast the walnuts, arrange them in a single layer on a baking sheet and (if you are lazy like me) put them under the broiler for 2 minutes, or bake for 10 minutes at 350F. Let these cool before chopping into smaller pieces.
Meanwhile, chop the broccoli into small pieces, then add the chopped red onion, dried cranberries, and toasted walnuts. Whisk** the dressing ingredients together and then toss with the broccoli mix. This may be too much dressing, depending on the size of your broccolis, so just add the dressing to taste. Store in the refrigerator until you're ready to eat, then combine with croutons immediately before eating!
Ingredients | Unit Cost | Total Cost |
½ loaf of French bread | $1.49/loaf | $0.75 |
2 T olive oil | $0.32/oz | $0.32 |
oregano | negligible | |
salt | negligible | |
pepper | negligible | |
½ C buttermilk | $0.55/C | $0.28 |
1/3 C mayonnaise | $0.08/oz | $0.21 |
2 T cider vinegar | $0.11/oz | $0.11 |
1 T sugar | $0.26/C | $0.02 |
1 C walnuts | $4.50/lb | $1.12 |
2 heads broccoli | $0.88/lb | $1.32 |
½ small red onion | $1.49/lb | $0.75 |
½ C dried cranberries | $0.33/oz | $0.66 |
TOTAL | $5.54 |
*Croutons are shockingly easy to make!!! No one should ever have to buy store-made! Also, the magic of croutons is that you never have to worry about buying too much bread, because once it goes stale--perfect for making croutons! Problem fixed with a delicious solution. Just store them away in a sealed container... I'm a little embarrassed to say how long I've kept them for (ahem, >1 week).
**A lot of times I just end up mixing vigorously with chopsticks...usually when I'm cooking alone and know that I'd have to wash the whisk myself. But really, any method works, just get the dressing smooth!
Monday, October 31, 2011

Without a doubt, this has been the best candy-less, costume-less halloween weekend I've ever had. Instead of frantic costume-making, I had a surprisingly non-frantic arts 'n crafts session helping with place cards for my cousin's wedding. Less than 24 hours later, in a quiet, sunny rose garden, they got married! (Congratulations Erwin and Cindy!!!!!!) The rest of the weekend was a blissful blur of food, family time, and more food. In fact, I almost completely forgot that it was Halloween, though looking back, I'm pretty sure one little girl wore a Disney princess costume--complete with a tiara--to the wedding. Now that I've arrived back from the wedding weekend, I've realized, in typical procrastinator fashion, that I have only a small window of opportunity left for a halloween-themed blog post!
 |
| From the right, my spooky neuron with my friends' pumpkins--Apple logo with Steve Jobs face, Toad from MarioKart |
Luckily, I'd managed to squeeze in some quality halloween related activities the week before. It's not halloween without a bit of sugary decadence, so this I Scream (ice cream) pie with its graham cracker crust and milano cookie-tombstones called out to me at once. As a bonus, I decided to decorate the tombstones with the names of famous neuroscientists, though this quickly turned into scientists with short names. Turns out, it was the perfect complement to my similarly geeked-out jack-o-lantern: a spooky neuron, with fangs! Happy Halloween everyone--may it be filled with sweet treats!

I Scream Graveyard Pie
Adapted from Everyday Food
Total Recipe Cost: $5.18 for 8 servings!
9 graham crackers
1/2 cup (1 stick) of unsalted butter, melted and cooled
1 pint ice cream #1 (I used cookies 'n creme)
1 pint ice cream #2 (I used mint chocolate chip, yumm)
12 oreo cookies or chocolate wafers
5 milano cookies
decorating gel (optional)
Preheat the oven to 325F. In a food processor (or by hand with a rolling pin), process the graham crackers until they are finely ground (it will be roughly 2 cups worth). Add the butter slowly, and mix until well incorporated. Press the graham cracker mixture firmly into a 9" pie plate, along the bottom and sides, then bake for 20 minutes until set. Let the crust cool at least 45 minutes before adding ice cream.
In a separate bowl, stir ice cream #1 until it's softened and can be easily spread. Using a rubber spatula (it sticks less to the ice cream), spread the ice cream evenly across the crust. Freeze the pie for at least 1.5 hours, until it's firm.
Soften ice cream #2 and spread it on top of the first ice cream layer. Freeze it again, while you prepare the remaining layer.
To make the "dirt" layer of the graveyard pie, finely process the chocolate wafers. (If you're using oreos, like I did, just twist off one side of the cookie for the pie, and use the remaining cookie+frosting halves to make your some doublestuff oreos for later! You're welcome.) To make the tombstones, cut the milano cookies in half and decorate with your own spooky twist! Spread the crushed cookie "dirt" evenly on the pie, then firmly place the cookie "tombstones" cut side down into the dirt. If the ice cream is too hard, use a knife to cut slits to place the tombstones in. Eat your scary treat immediately, or store frozen for up to a week! Happy Halloween!!!
| Ingredients | Unit Cost | Total Cost |
| 9 graham crackers | $0.06/cracker | $0.54 |
| 1 stick unsalted butter | $0.11/T | $0.88 |
| 1 pint ice cream #1 | $2.88/1.5 quarts | $0.96 |
| 1 pint ice cram #2 | $2.88/1.5 quarts | $0.96 |
| 12 oreos | $0.07/cookie | $0.84 |
| 5 milano cookies | $0.20/cookie | $1.00 |
| TOTAL | | $5.18 |
Wednesday, October 19, 2011

Tomatoes are like apples. Okay--they're not like apples at all, but I love eating them like they are. It's a quintessential summer moment, biting into a raw tomato that's fresh off the vine. The only problem with this scenario (or at least blogging about it) is 1) October doesn't really qualify as summer, but hey, I live in San Diego so cut me some slack and 2) who reads a food blog to hear about how someone didn't cook tomatoes? My autumn-themed solution to all this... slow roasted tomatoes. Yummm.

Seeing as I live in an apartment with limited balcony sunshine, these beautiful homegrown tomatoes are courtesy of my friend Ali, whose husband is plant
My mom says it's a waste to cook homegrown tomatoes, and for the most part, I agree with her. They just taste so good alone! There's no way grocery-bought can even compare to homegrown. Even Buddy, Mr. Veggies/Fruit-Hater (aka boyfriend), gobbled these up raw, and declared that these were special tomatoes. Nevertheless, this recipe was begging to be made, so I fired up my oven and set to roasting them up. These tomatoes were so sweet and delicious before cooking, that roasting them for hours only concentrated that flavor and made it even richer. After eating these, there's no way I can call roasting fresh tomatoes a waste--it just tastes like pure decadence.

Slow Roasted Tomatoes
Adapted from Smitten Kitchen
tomatoes (small varieties like cherry, grape, etc.)
olive oil
salt
pepper
Preheat oven to 225 degrees. Cut tomatoes in half, cross-wise and arrange on a parchment-lined baking sheet. Drizzle with a little olive oil, then sprinkle some salt and pepper (these won't need much since they're so flavorful on their own). Roast for three hours, or until the tomatoes have shriveled on the outside, but are still a little juicy on the inside. You'll have to adjust the time according to the size of your tomatoes, but don't worry, I encourage intermittent (and in my case, usually frequent) taste-testing.
You can refrigerate these up to a week to store, though I like to heat them up a little before eating again. Here are some of my favorite ways to eat these warm:
-Spread whipped cream cheese on crackers, top with thinly sliced basil (chiffonade, if we're being fancy) and a roasted tomato!
-Brighten up a simple pasta by tossing with these roasted tomatoes. Add olive oil, red wine vinegar, basil, salt, and pepper!
------------------------------------
No "Total Recipe Cost" this time... after all, it wouldn't be very nice to rub it in that these delicious tomatoes were free for me. :) However, if you insist on a calculated cost, I'd estimate probably $2-3/pint of grape tomatoes at the supermarket. But, considering that the oil, salt, and pepper are negligible costs, this is pretty cheap for some high-impact flavor!
Friday, October 7, 2011

Red tastes better. Whether it's children fighting over the red M&Ms (they taste the same, people!), or the sad decline of Red Delicious apples, we almost can't help that our eyes are drawn to that rich, full color. It's like this whole Red Velvet cupcake mania now--don't you all know that it's just chocolate flavor with red food coloring?! Now, try to use this argument against cha siu, and it's a whole other story. Is that hypocritical? Of course! But those of you who grew up eating cha siu know exactly what I'm talking about.

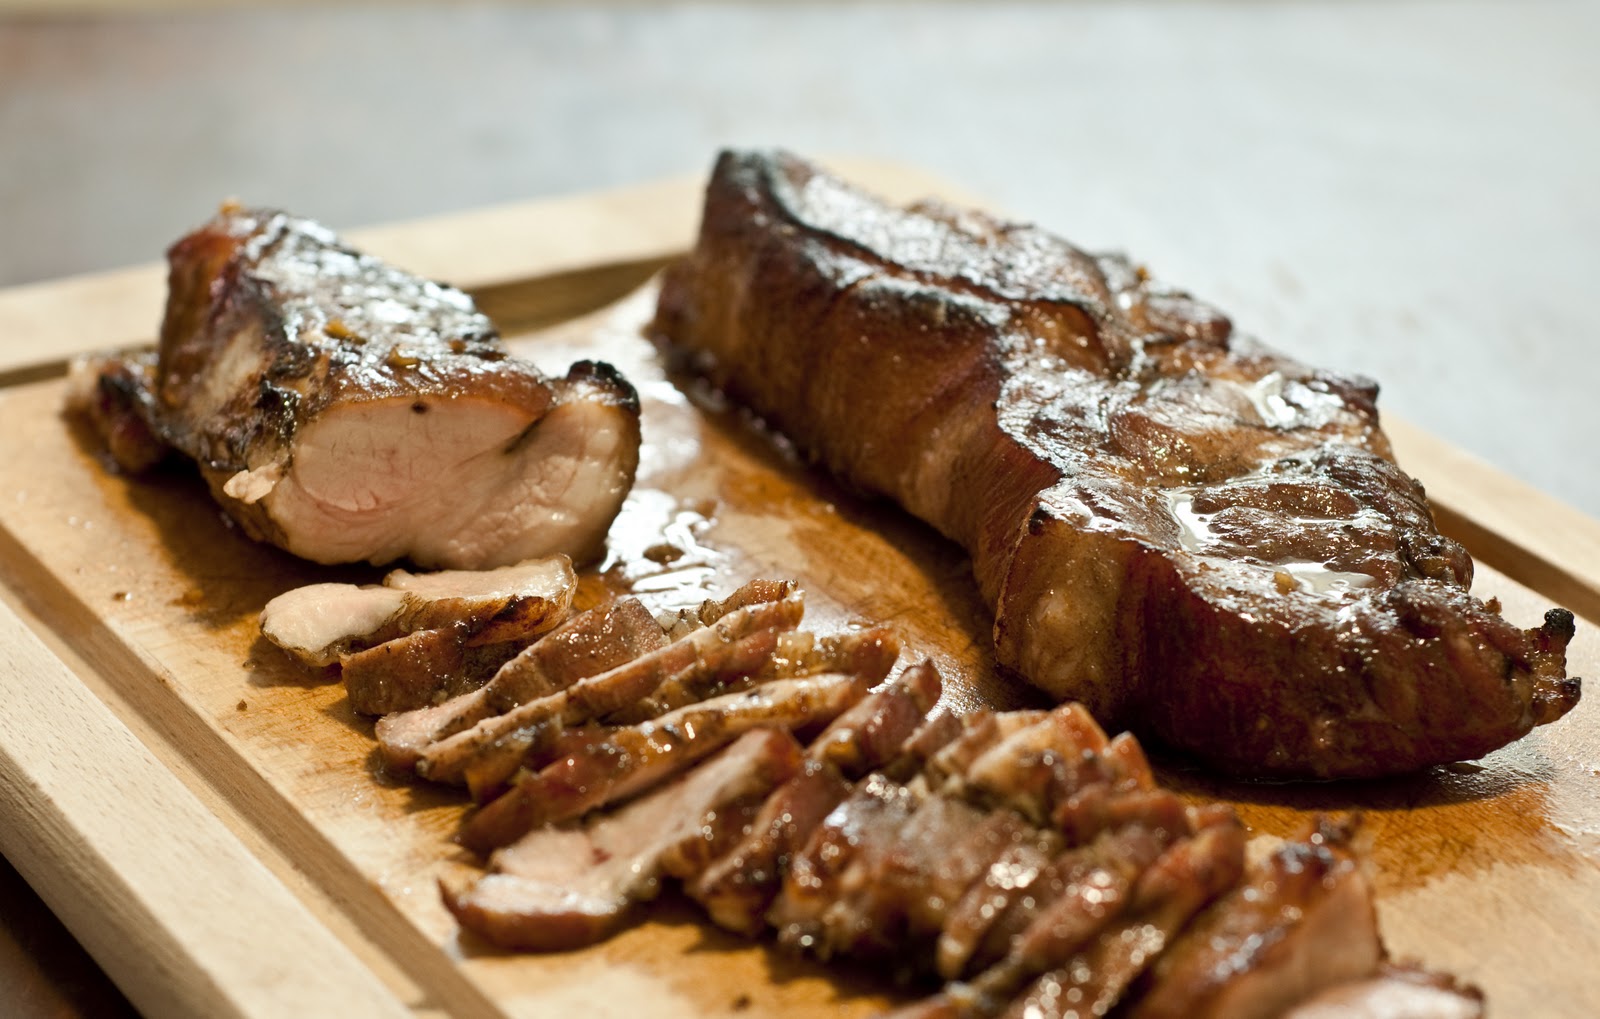
Translated, cha siu literally means "fork roasted," and you see this bbq pork in windows all over Chinatown, hanging from skewers, deliciously burned, and dripping with honeyed glaze and rendered fat. Everyone knows it's just food coloring, but that brilliant red sums up all that nostalgia and lures you in for an impulse food-buy.

Digging through my old photos, I found one of a Chinese restaurant window and sadly the cha siu, hanging from the bottom rack, is cut off--upstaged by the glossy roast ducks. Even with its bold color, cha siu can get out-shined, especially when accompanying it in the window is often a spectacular whole roasted pig, complete with a wide expanse of golden crispy skin. In truth, I think I've taken cha siu for granted. You don't reserve it for special occasions, the way you might a roast duck, and as a matter of fact, it always ended up in many everyday meals. Growing up, we'd eat it with plain rice--fresh from the store, and still glistening with honey. I would snatch up the crispy choice pieces, and days later, the leftovers would be in fried rice, in noodles, and it even--I recently experimented--tastes great on pizza. We had it often, and it was delicious in every different dish it managed to sneak into.
For me, cha siu is the epitomy of comfort food. The odd part is that it's never occurred to me to cook it myself; it's always been one of those things I thought was best left to the experts. But when I came across a recipe in Appetite for China, I had to at least try it. In the end, I omitted the food coloring, being too lazy (and cheap) to justify the trip to the store for purely cosmetic reasons. When this cha siu came out of the oven, I was pleased by its more natural rosiness, although when I took my first bite, I couldn't tell if it tasted the same as I remembered. It simply didn't taste red, if that makes any sense... I know, it doesn't. That didn't matter though, because it tasted like crispy honeyed perfection, with that rich earthiness of 5-spice layered beneath the sweetness. More importantly though, and I suppose this is the magic of cha siu, is that even when I'm 3000 miles away, it tastes like a slice of home.

Cha siu (Chinese BBQ Pork)
Total Recipe Cost: $5.02 for 8 servings (2lbs)! (Cha siu from the store is around $8/lb!)
Adapted from Appetite for China
While this isn't technically cooked in the traditional way, the bake 'n broil combo is an astonishingly easy alternative with exceptionally tasty results. Since I'm not a BBQ master, a meat thermometer came in mighty handy for this recipe! Nobody likes dried-out cha siu, so I aim to finish at an internal temperature of 145 degrees (newly approved by the USDA, who recently lowered the safe temperature from 160 degrees). My times may vary from yours, depending on differences in size of the pork strips, so just be careful!
2 lbs pork butt (don't worry, it's actually the shoulder!)
4 tablespoons rice wine
4 tablespoons soy sauce
4 tablespoons sugar
1 tablespoon hoisin sauce
1 teaspoon 5-spice powder
6 cloves garlic, minced
few drops red food coloring (optional)
3 tablespoons honey
Cut the pork butt into strips, roughly 2 inches in diameter. Trim off some of the fat, but don't go all health-crazy--it needs a little fat to keep it moist! Mix together the rice wine, soy sauce, sugar, hoisin sauce, 5-spice, and garlic for the marinade; add some food coloring here, if you want that extreme red glow. Vigorously rub this into the meat, and marinate it in the refrigerator overnight (or at least a few hours).
Preheat the oven at 400 degrees. Arrange the meat in a single layer on a foil-lined baking sheet (this will make your dishwasher infinitely happier!), discarding the marinade. Bake for 15 minutes, or until the meat reaches an internal temperature of about 130 degrees. Flip the meat over and switch the oven to broil. If the meat starts to burn too much, move to a lower rack in the oven. Cook for about 10 minutes, until the meat is slightly burnt, and the thermometer reads 145 degrees.
Immediately, while still hot, toss the cha siu with the honey, and allow the meat to rest for 5 minutes. Thinly slice the cha siu, and gobble it up with a steaming bowl of rice!
Cha siu (Chinese BBQ Pork)
Total Recipe Cost: $5.02 for 8 servings (2lbs)! (Cha siu from the store is around $8/lb!)
Adapted from Appetite for China
While this isn't technically cooked in the traditional way, the bake 'n broil combo is an astonishingly easy alternative with exceptionally tasty results. Since I'm not a BBQ master, a meat thermometer came in mighty handy for this recipe! Nobody likes dried-out cha siu, so I aim to finish at an internal temperature of 145 degrees (newly approved by the USDA, who recently lowered the safe temperature from 160 degrees). My times may vary from yours, depending on differences in size of the pork strips, so just be careful!
2 lbs pork butt (don't worry, it's actually the shoulder!)
4 tablespoons rice wine
4 tablespoons soy sauce
4 tablespoons sugar
1 tablespoon hoisin sauce
1 teaspoon 5-spice powder
6 cloves garlic, minced
few drops red food coloring (optional)
3 tablespoons honey
Cut the pork butt into strips, roughly 2 inches in diameter. Trim off some of the fat, but don't go all health-crazy--it needs a little fat to keep it moist! Mix together the rice wine, soy sauce, sugar, hoisin sauce, 5-spice, and garlic for the marinade; add some food coloring here, if you want that extreme red glow. Vigorously rub this into the meat, and marinate it in the refrigerator overnight (or at least a few hours).
Preheat the oven at 400 degrees. Arrange the meat in a single layer on a foil-lined baking sheet (this will make your dishwasher infinitely happier!), discarding the marinade. Bake for 15 minutes, or until the meat reaches an internal temperature of about 130 degrees. Flip the meat over and switch the oven to broil. If the meat starts to burn too much, move to a lower rack in the oven. Cook for about 10 minutes, until the meat is slightly burnt, and the thermometer reads 145 degrees.
Immediately, while still hot, toss the cha siu with the honey, and allow the meat to rest for 5 minutes. Thinly slice the cha siu, and gobble it up with a steaming bowl of rice!
Ingredients | Unit Cost | Total Cost |
2 lb pork butt | $1.99/lb | $3.98 |
4 T rice wine | $0.07/oz | $0.14 |
4 T soy sauce | $0.08/oz | $0.16 |
4 T sugar | $0.26/C | $0.07 |
1 T hoisin sauce | $0.10/oz | $0.05 |
1 t 5-spice powder | $0.17/oz | $0.03 |
6 cloves garlic, minced | $0.24/head | $0.12 |
3 T honey | $0.31/oz | $0.47 |
TOTAL | $5.02 |
Subscribe to:
Posts (Atom)


